1
Email Automation
Build follow-up flows, seasonal campaigns, win-back messages, and coupon-led offers without leaving your store data behind.
WooCommerce email marketing and analytics
Blue Odin brings automation, customer segmentation, campaign tools, profit tracking, and key ecommerce metrics into one practical workspace for WooCommerce teams.
Powerful features
Build follow-up flows, seasonal campaigns, win-back messages, and coupon-led offers without leaving your store data behind.
Create practical groups from order history, spend, products purchased, and activity so every email feels more relevant.
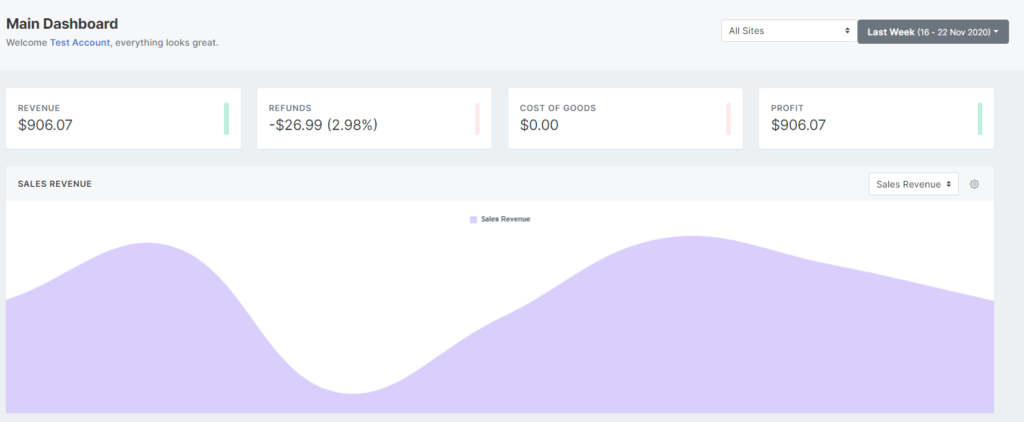
Track revenue, refunds, average order value, product performance, growth, and profitability from a dashboard built for WooCommerce.
Add costs and compare product performance so decisions are based on margin, not just top-line revenue.
Automate the relationship
Blue Odin connects customer behavior with campaign planning, so your store can follow up after orders, reward repeat buyers, re-engage inactive customers, and send targeted seasonal promotions.

Business intelligence
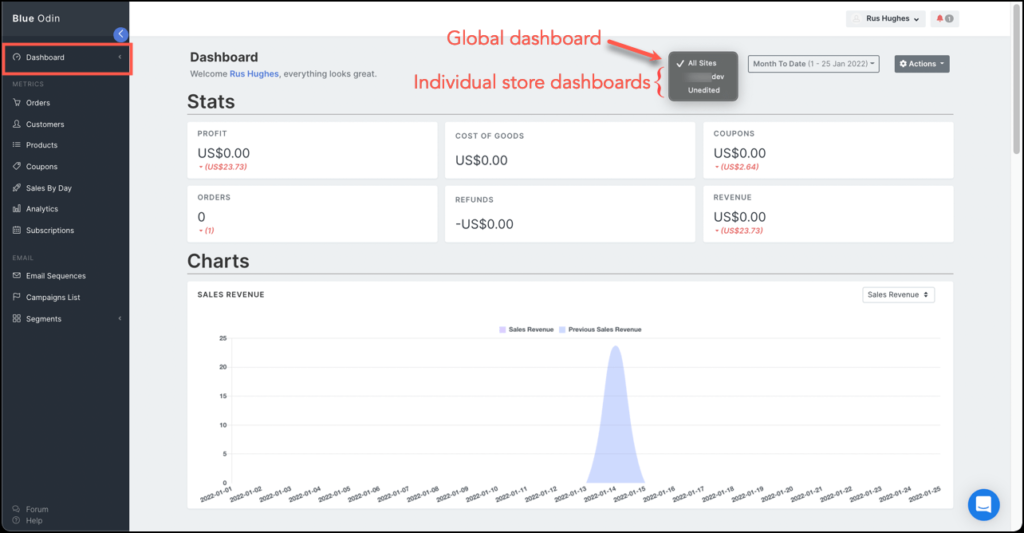
Monitor daily, weekly, monthly, and annual performance. Compare products, sites, and profit drivers so the team can focus on growth, not manual reporting.
Built for teams
See the health of every WooCommerce store, understand what is growing, and spot problems before they become expensive.
Plan campaigns using purchase behavior, customer segments, and product performance instead of guesswork.
Compare SKUs, refunds, costs, and trends so the catalog gets sharper every month.
Trusted by store owners


Pricing
Up to 30 orders / month
1 site
Email automation, marketing campaigns, customer data, profit dashboard, and ecommerce KPIs.
Sign UpUp to 250 orders / month
3 sites
Email automation, marketing campaigns, customer data, profit dashboard, and ecommerce KPIs.
Sign UpUp to 5,000 orders / month
10 sites
Email automation, marketing campaigns, customer data, profit dashboard, and ecommerce KPIs.
Sign UpUp to 10,000 orders / month
20 sites
Email automation, marketing campaigns, customer data, profit dashboard, and ecommerce KPIs.
Sign UpLatest guides

The ecommerce world is a trillion-dollar market. Want to get your share of this massive pie? Then learn how to sell like a pro! I know this is easier said than done, so in today’s blog post, we’ll cover the most important techniques to help you sell like a pro via your ecommerce website. These...
Email marketing is one of the most profitable and cost-effective ways to make money online. How profitable? Imagine making $42 in sales for every $1 spent – that’s a 4100% return on your investment! We didn’t pull these numbers out of thin air; they’re based on a study done by DMA UK. So, how do...

It’s normal to feel threatened by ecommerce competition. But don’t let it get in the way of your store’s success. Instead, think of what you’ll reap when you do succeed – the knowledge that your product or service is solving real problems, financial rewards for everyone in your team, the satisfaction of achieving your goals,...